BW4031 Ethernet to J1939 Gateway Support
Documents and Downloads
Unboxing and Installing
AB7645 to BW4031 Migration Guide
Notice: BW4031 Rev C has replaced Rev B
As of December 1, 2020, all BW4031 units shipped will be Revision “C”.
Revision “B” had been the version shipping since the introduction of the BW4031 in 2018.
Revision C eliminates the use of the mini black 6 pin phoenix connector for inputting the CAN signals and utilizes the 5-pin larger gray screw terminal connector as shown below:
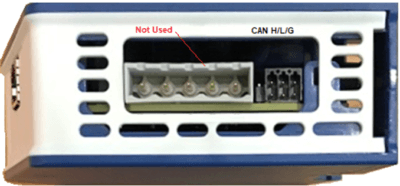
REV B CAN connector – 6 pin mini-Phoenix used – 5 Pin Phoenix not used
REV C CAN Connector – 5 Pin Screw Terminal Phoenix used – 6 pin mini Phoenix not used
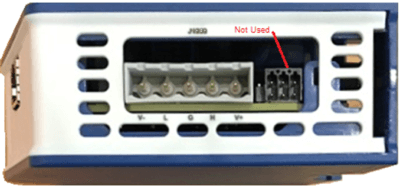
Note the silkscreen legend changes for Rev C
The Revision C BW4031 is shipped with a 5 pin Male screw terminal connector for wire termination.
Rev C requires V-, CAN L, CAN G, CAN H and V+ to be connected to the 5 pin Phoenix. Power is required at this connector to power the CAN circuitry.
DC power must also be connected to the 3 pin Power connector located at the top of the module, as was required for Rev B. The power wires can be looped from the 5 pin Phoenix to the top 3 pin power connector.
Rev B module Firmware is identified as version 1.XX – enables the 6 pin mini Phoenix CAN port
Rev C module Firmware is identified as version 2.XX – enables the 5 pin Phoenix CAN port
Pyramid will continue to support version 1.XX firmware through 12/31/2021
The support page content below includes both the current Rev B 1.X Firmware Update Kit and User Manual and the new Rev C 2.XX Firmware Update Kit and User Manual
Important! Please ensure that you are downloading the correct Firmware Update Kit and User Manual for the revision of the module you are currently using.
Note: Pyramid Solutions will be selling Rev C update kits for those who wish to convert their BW4031 Rev B units to Rev C. Contact BridgeWay inside sales for information on this update kit.
BW4031 User Manual, BWConfig Tool and EDS File
BridgeWay 2.0 Configuration Tool
- Current Revision C 2.XX Firmware (for units with 5-Pin Phoenix connector for J1939)
- Previous Revision B 1.06 Firmware (for units with 6-Pin Mini-Phoenix connector for J1939)
BW4031 Firmware Update Kit
BW4031 Sample Configurations and Application Notes
- Common Parameter Configurations for J1939
- Configurations for J1939 ECU Simulation
- Interfacing to J1939 with ControlLogix
- Interfacing to J1939 with MicroLogix
- Interfacing to J1939 with Modbus TCP
- J1939 Data Mapping Explained
- Monitoring J1939 Diagnostic Trouble Codes
- J1939 Quick Start Configurations
- Frac Truck Application Example
- Water Pumping Operation Application Example
- Generator Application Example
- Test Cell Application Example
- Marine Vessel Application Example
BW4031 Certifications
Data Sheet
FAQs
What are the differences between the BW4031 and the legacy AB7645?
Check out this handy comparison guide that highlights differences between the AB7645 and BW4031.
How do I replace an AB7645 with the newer BW4031?
Migrating from AB7645 to BW4031 is an easy task with our migration tutorial. Download the tutorial for step-by-step instructions to ensure a smooth and easy migration.
What are the installation requirements?
- 24VDC, see the user manual for the operating voltage range and other specifications
J1939 Network
- Ensure the BW4031 is installed on a properly-wired and terminated J1939 network
- Ensure the J1939 network length is within specification (max 40-meter trunk with max 3-meter drops from the trunk)
- Ensure that the BW4031 J1939 node address is unique on the network and is set in a manner as to not interfere with a control network
Ethernet Network
- Ensure the BW4031 is installed on a properly-wired and segmented Ethernet network
- Ensure that the BW4031 IP Address is unique on the network
How do I configure my BW4031?
How can I schedule output messages to be sent only when needed?
You can do this in one of two ways:
- Set the rate of the output PGN message to 0, meaning it will not be sent until it is requested on the J1939 network by another node.
- Use the message bridging feature, which allows the PLC (or another controlling device) to “on demand” bridge a message from EtherNet/IP or Modbus TCP to a J1939 PGN message that will be sent immediately on the J1939 network.
Can the BW4031 operate at multiple addresses on a J1939 (CAN) network?
Some J1939 applications require that PGN messages be sent by specific CAN addresses on a single J1939 network. e.g. the engine ECU wants to see remote speed control (PGN 0) from address 7 and ignores it from all other addresses. In this scenario, one BridgeWay device will be required for each CAN address that needs to transmit PGN messages. Each BridgeWay will require a unique J1939 (CAN) address (e.g. one at address 7 and the other as address 5) and a unique host (Ethernet, Modbus RTU or PROFIBUS) address if a single PLC is used on a single host network.
Can BWConfig 2.0 show me incoming/outgoing data in the device?
No, BWConfig 2.0 displays configuration, status and diagnostic data only. The BW4031 does provide web pages that display a view of input and output data in the module as well as status. Just point your browser to the IP Address of the BW4031 and the pages will display. The BW4031 must be on the same subnet as your PC to view the pages.
Why am I not receiving PGN data? How do I know that the PGN messages are present on the J1939 network?
You will need a J1939 (CAN) network monitor to view the PGN messages on the J1939 network. Pyramid Solutions offers a J1939 PGN monitoring tool, NetStaX CANable Lite to accomplish this. CANable Lite is a simple tool that consists of the CANable Lite Windows Application and a USB to CAN Adapter.
BridgeWay Configuration Tool
Download NowGet tips, updates and insightful content straight to your inbox.
Subscribe NowContact Support
Please fill out the form below completely.